Tuesday, December 29, 2009

Triple Chocolate Chunky Cookies... some people like them.


After cleaning up from my experience baking 30 dozen cookies for Christmas I started in on making some simple chocolate cookies for my friends. These cookies are best if left slightly under baked.


Ingredients:
1 cup flour
1/2 cup unsweetened cocoa powder
1/2 teaspoon baking soda
1/2 teaspoon salt
6 ounces premium dark chocolate
6 ounces milk chocolate
1/2 cup unsalted butter
3/2 cups sugar
2 large eggs
1 teaspoon vanilla extract

The process for making these cookies is reasonably simple. First we need to start preheating our oven to 325 F. While this is warming up we can mix together the flour, cocoa, baking soda, and salt in a bowl. On the stove top we can set up a water bath to gently melt our dark chocolate with the unsalted butter.


Once the dark chocolate has fully combined with the butter we can then mix this chocolate with the sugar, eggs, and vanilla in the bowl of an electric mixer. When these ingredients have been fully mixed we can then start adding the flour mixture to the bowl.


Now for the slightly more tricky part of the recipe. You'll have to chop the milk chocolate up into chunks. This can be done using a sharp knife and a cutting board. Please take great care while trying this part, the chocolate will become slippery as you work with it so take care when working with your knife. When you have chopped up all of the milk chocolate you may fold the chunks into the batter.


The batter, now completed, can be dropped on to an awaiting cookie tray. I use a pair of table spoons to gather up and drop amount of dough onto the cookie sheets, spacing drops about two inches apart. Bake cookies for about 15 minutes.

I hope you enjoyed this recipe! :)


Wednesday, December 23, 2009

Things I learned baking 30 dozen cookies in 24 hours...


So I decided to bake cookies for my friends this Christmas. I thought 'excellent idea Jamie, you can take pictures for your blog and make an entry or two about them'. Then the reality set in. If you decide to bake cookies for your friends, then your going to have to make a fair number of them. In my case I needed to make enough to fill one dozen cookie tins. Now making cookies isn't much of an issue for me as I quite enjoy the process and the result; however I wasn't aware how it becomes different when your baking multiple batches of several varieties. So in this post I submit a few points of advice for those of you planning on baking cookies en mass.
  • Drop cookies are your friends! The mixing of ingredients can take some time, but you gain time in how fast you can setup cookie trays for the oven. Good drop cookies include peanut butter and chocolate chip cookies.
  • Beware the simplicity of shortbread. It's one of the simplest recipes out there, however preparing each cookie takes time and patience. Generally one rolls out cooled dough on to a cutting board then uses a cookie cutter to form each cookie. The tricky part is not tearing the cookie as you remove it from the batter, then repeating this many dozens of times.
  • Alcohol is your friend! You can make a center piece to your cookie arrangements by making one special batch of alcohol laced cookies - these are of course only for adults :) I recommend making Rum or Whiskey balls. You can put a handful inside of a small re-sealable container so that the aroma is retained. See my chocolate rum balls for an example.
  • Pick out your containers carefully. Those nice looking 16" tins can hold 3 or 4 dozen cookies each. Try for the 8 or 10" tins, they hold about 12 to 18 cookies - this is important in that one batch of cookies can generally fill two tins instead of just one.
I suppose the important thing to take away from this experience is that you really need to think ahead when taking on a project of this size. I know that next year this will be much easier if I follow my own advice ;)


Tuesday, November 17, 2009

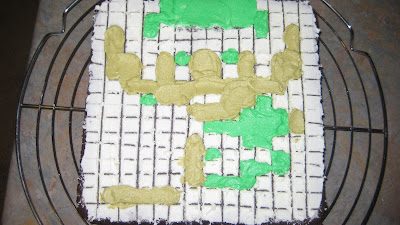
8-Bit Brownies


To create an 8-bit brownie all you need is some brownie mix, a pan, plain white frosting, food colouring, some pallet knifes, tooth picks, and if available a icing pipette.

To start choose an 8-bit image you want to create, here I have chosen Link.

Then determine which colours you will need to create in frosting, this guide may help you achieve the hues your after: http://www.sugarcraft.com/catalog/coloring/colormixingchart.htm. For my design I only need green, tan, brown, and yellow. To make things easier on myself I tend to make a large batch of white frost, taking small portions aside to make each required colour (saving aside some white frosting to fill in left over surface later on).

Now for the fun part...

First dirty ice your brownie. This means to coat your brownie with a thin coating of frosting.

Then use a pallet knife to score the base coat of frosting into a grid pattern.

Now you can follow your pattern, filling in each square in your grid with the appropriate coloured frosting :) When your done, just use your left over white frosting to cover over the grid pattern markings.


Obviously filling in the grid pattern will require a few techniques to get all the frosting into the squares. Here are a few tips:

  • An icing pipette is the easiest way to apply frosting to each square. Using the pipette does take some practice, however once you have the knack you'll enjoy the results.
  • Pallet knives will allow you to spread frosting over a large area quickly, if your design doesn't have too many colour variations then it will speed up the process. I use the flat edge of the pallet knife as a wall to help keep frosting from crossing lines when initially spreading it on.
  • Tooth picks. I use these to pull frosting into the 'corners' or towards the edge of different colours.
  • Frosting consistency. A creamy frosting is easier to spread. Once the frosting begins to set it will start to pick up crumbs from the brownie surface - you will want to avoid having crumbs drawn across or mixed into the frosting (it disturbs the colour effect).

I hope that having the above guide helps to motivate you all to try out making an 8-bit brownie, enjoy!

Wednesday, October 28, 2009

Graveyard Cookies

Normally I don't really get into baking cookies with a Halloween theme, but my turn for cookie night came up so here's my attempt. The concept for this cookie is a cup cake graveyard with cookie headstones.


The ingredients:
1 Chocolate Fudge cake mix.
8 oz Bittersweet chocolate (or Chocolate squeeze tube icing).
1 cup water
1/3 cup milk
1/2 light veg oil
1 cup ground pecans
1 tub chocolate icing
1/2 cup brown sugar
2 1/2 cup flour
2 tbsp magic powder5 large eggs
3/4 cup butter (melted)
1 tbsp Orange zest
2 tbsp Orange Juice


Preparation of the cup cake grave yard involves using a standard cake mix to produce a few dozen cupcakes, then icing their tops and rolling them in ground pecans. The effect I'm going for here is to mimic graveyard soil on the surface of the cup cake.


Cup Cake Ingredients:
1 Chocolate Fudge cake mix.
3 eggs
1 cup water
1/3 cup milk
1/2 light veg oil
1 tub chocolate icing
1 cup ground pecans

Follow the directions of your cake mix to make the cup cakes. Then grind whole pecans and place the result in a bowl. Use your chocolate icing to top the cup cakes, then roll them in the pecans. When this operation is done you'll want to use a knife to start an opening on the surface to allow the head stone cookie to be easily inserted into the cake.


The cookie head stones are made from a simple recipe as seen in my apple cookies.

Cookie Ingredients:
1/2 cup brown sugar
2 1/2 cup flour
2 tbsp magic powder
2 large eggs
3/4 cup butter (melted)
1 tbsp Orange zest
2 tbsp Orange Juice.


All the ingredients are well mixed together, then the dough is placed in the fridge to chill for a half hour, then the dough is rolled out on to a flat, floured surface for cutting. The shape we're going for here is a basic tomb stone. One end is rounded, while the other is tapered to allow for easy insertion into the cup cake. The cookie is baked at 375 F for approximately 15 to 20 minutes until golden brown.


So you may be wondering what 'Cookie Night' is all about? Cookie night is a way to have a group of friends take turns baking cookies once a week for the crowd. The baker chooses their own cookie and so can control the difficulty and costs that go into their creation. Many of the posts on this blog come from the cookies I've made for my crowd.

I hope you enjoyed this recipe!

Saturday, October 10, 2009

ClassCastException: "German Beer Coffee Cake" is not a cookie.

So this recipe isn't for a cookie, but I enjoyed it so I'm including it in my blog anyway :P

Couldn't find a German beer so had to settle for Heineken (such is life on the Rock, can't find ingredients we want all the time).

I made this cake for an Oktoberfest dinner party with my friends. I think it went over well :)


Ingredients (Cake):
1 cup unsalted butter
2 cups dark brown sugar
2 eggs
3 cups flour
2 tsp baking soda
1 tsp cinnamon
1/2 tsp allspice
1/2 tsp ground cloves
2 cups beer (German beer)
2 cups raisins
1 cup chopped walnuts or pecans.

Cream butter and sugar together, then add eggs and beat well.


In a separate bowl mix together the dry ingredients.


Now incorporate the dry and wet mixes together. While combining add in small quantities of the beer until all are mixed thoroughly. Once these are well mixed you may add in the raisins and nuts.

The next step is to grease and flour a bundt pan (this will allow you to remove the finished cake later on). Bake the cake at 350F for 75 minutes. Poke with a tooth pick to determine when done. Let the finished cake stand for 10/15 minutes, then wrap in tin foil and let it sit for 24 hours (this stabilizes the cake).


With the cake prepared you may now put together the spread.

Ingredients (Spread):
1/2 cup unsalted butter.
2 shots of Rum

To make Rum butter spread all you need to do is whip butter and Rum together in a mixer until it appears light and fluffy. Place the mixture into a bowl and refrigerate to keep until you serve the cake.


I hope you enjoyed this recipe! :)

Monday, October 5, 2009

Whisky Raisin Cookies... I'm seeing a trend here...

So time for another cookie recipe, this time it'll be for Whisky Raisin cookies.


I find that soaking dried fruits in liquor seems to always turn out nicely.

The ingredients:
1 cup unsalted butter
1 cup sugar
2 large eggs
3 cups flour
1/2 cup Whisky
1/2 cup raisins
1/4 cup heavy cream
1 tsp vanilla

The key step to this recipe is soaking the half cup of raisins over night in Whisky (or Rum, Vodka, which ever liquor you prefer). The dried fruit will soak up the majority of the liquid and transfer the flavor to your finished cookies. The next step is to combine the ingredients in mixing bowl, saving aside vanilla, one egg, and cream for cookie wash.


Once fully combined let the mixture sit for a few minutes. Then with a lightly floured surface and rolling pin begin rolling out the dough. Use a cookie cutter to cut out the shapes you desire, then place on a cookie sheet.


Preheat the oven to 350F, and prepare the cookie wash. For this recipe the wash consists of heavy cream, an egg, and vanilla extract to taste. Bake the cookies for 12 to 15 minutes or until golden brown.

I hope you enjoyed this cookie! :)

Wednesday, September 16, 2009

Chocolate RumBalls. Careful, they may burn going down :)

This recipe is for Chocolate RumBalls. It's a little different from my regular recipes in that this one has liquor and does not require baking*.


* Roasting of nuts will be required.

The ingredients list is pretty simple but open to interpretation. You can substitute various components for your own preferences.

1 tbsp Unsalted Butter.
2 tbsp Honey (could also substitute with Corn Syrup).
1 tsp Vanilla Extract.
1 1/2 cups Roasted Pecans (Choose your preference for type of nut).
2 1/2 tbsp Cocoa.
1/4 to 1/2 cup Rum (Choose your preference for brand of Rum, I like London Dock and Appletons for cooking. Add more Rum for a stronger flavour).
1 1/4 cups Shortbread Cookies (Use home made or store bought).
1 cup Icing Sugar.


The first step is to roast the nuts for eight minutes at 350F. This will release the flavour from the nuts.


While the nuts are roasting we can crumble the shortbread cookies to serve as the cookie base for our RumBalls. Setting your food processor to pulse will do the best job, we don't want to create shortbread paste. Once completed poor the crumbles into a mixer bowl.


Now with the pecans roasted we can put them through the food processor (let them cool for a moment before adding to processor). Combine the shortbread crumble, nuts, 1/2 cup of icing sugar, and cocoa in the mixer bowl. Once mixed we may add the wet ingredients (honey, vanilla extract, butter, and Rum).


Mixing thoroughly place the resulting batter into the fridge until cool (this will take a few hours).


Removing the batter from the fridge begin rolling one inch balls, placing them onto a parchment lined baking sheet.


To help seal in the flavour you may roll the completed balls in remaining 1/2 cup of icing sugar (or substitute with cocoa powder).

Its amazing how fast these disappeared before I could take a picture.

I hope you enjoyed this cookie! :)

Monday, September 14, 2009

Chocolate Crinkle: Funny name, serious chocolate.


The Chocolate Crinkle is a ball cookie, best enjoyed with a cup of coffee or tea. The cookie gets its name from the cracked surface pattern seen once the cookie is baked.

Ingredients:

16 oz Chocolate
8 tbsp butter
4 eggs
1 cup sugar
1 tsp vanilla extract
3 cups all purpose flour
1/2 tsp salt
1 tsp baking powder
2 cups icing sugar (or cocoa powder)

This cookie has a four stage preparation:

1) Chocolate Preparation:

Melt butter over a hot water bath (boil water in one pot, place pot for butter & chocolate inside this pot to melt ingredients). Once melted slowly add in chocolate, stirring until ribbony consistancy achieved.


2) Mixing Dry Ingredients:

In a mixing bowl combine eggs, sugar, and vanilla extract. Mix thoroughly. Now we add the dry ingredients (flour, salt, and baking powder). Make sure to fully combine all ingredients.


3) Rolling Balls:

Roll about a tbsp's worth into a ball, then reroll the dough ball in the icing sugar or cocoa powder.


4) Baking :)

Pop the cookies in the oven for 10 minutes at 350 C. The surface will crack once cooked.


When fresh the centers of each cookie will be doughy or fudge like, to replicate this effect once cooled just pop them in a microwave for a few seconds.

Hope you enjoyed this cookie! :)

Thursday, September 10, 2009

Sweet abomination no! Their Windows cookies!!!

For a hardcore UNIX user like myself, these cookies were the hardest to make. Unlike their name sake however I've thoughtfully included the source ;)


Ingredients list:
Strawberry, Blueberry, and Lemon Jam.
3 1/2 cups flour.
1 1/3 cups cornmeal.
3/4 teaspoon salt.
2 1/4 cups unsalted butter.
1 1/2 cups sugar.
3 large eggs.
Green food colouring.
1 tsp Lime Juice.


Mix the cookie base of butter and sugar until completely combined. Then slowly add in eggs, flour, salt, and cornmeal. The cornmeal is the secret to this recipe, it provides the pastry with an unexpected flavour.

The dough is spread out on to a cookie sheet. To make removing the cookies from the pan easier you may place a sheet of parchment paper on the pan bottom, then apply butter. Keep aside 1 cup of dough. This will be used later on to create the window bars on the cookies. Bake the cookie base for 20 minutes at 350F, the top should be just becoming golden brown.


While your waiting for the cookie base to bake you can prepare the jam toppings. I used store bought jams, to make these easier to spread I used a table spoon to break up any large chunks of berries. To create the Green jam for the Windows symbol I took aside 1 cup of the lemon jam/spread and mixed in Lime juice and several drops of green colouring.

With the cookie base ready I take a paring knife and score the basic flag shape. This will make it easier to perform the final cuts later on.


Take a spoon, and great patience, I start the process of spooning a small quantity of jam into the proper colour positions for the symbol. Once this is complete I take my saved dough and place it into a piping bag. Using the piping bag draw the window frame around the jam and perimeter of the cookie. Once done, place the cookies into the oven for another 20 minutes at 350F.


When the cookies are done you may use a paring knife to carefully carve out your cookies from the pan.


Hope you enjoyed this cookie! :)

Wednesday, September 9, 2009

Brownies should never be boring!

Ever need to figure out something baked to bring along to a friend's gathering?

My standard fall back is to whip up a quick batch of Brownies, nothing too special beyond the common boxed mix you may pick up at your local grocery store.

Now this is all good and greatly accepted by many people, however its not too difficult to notch it up a bit :)

My simple approach is to creatively use butter cream frosting.

Butter Cream Frosting:

1/2 cup unsalted butter
2 tbsp heavy cream
1 tsp vanilla
3 cups icing sugar

Do not melt the butter. Use an electric mixer or blender to whip the butter until creamy. Then add the cream and vanilla. With these ingredients mixed begin adding icing sugar, mixing the entire time. If you add too much sugar (frosting becomes too dry) just pour in a little more cream and mix again.

Using this base frosting you can mix in various food colourings to produce an artist's palette, and use the Brownies as a canvas.

Here are a few samples:


If you choose to carve up your batch of Brownies you can try out other creative frostings, such as making Tetrominoes.


I hope these samples provide you with some inspiration to make your next batch of Brownies exciting :)