Saturday, May 29, 2010

Homemade Chocolates in Gift Boxes

This little project was intended as a personalized gift for a small group of friends, I think they turned out well so I'm posting some pics of the chocolate making process :)
For this batch I'm using marshmallow and/or butterscotch chips as fillings.
Here I switched to Rice Krispies instead of butterscotch.
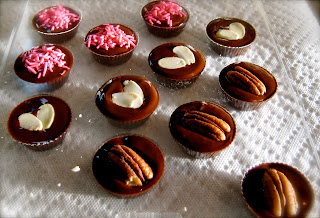
The chocolate mold above makes for great peanut butter cups. I used peanut butter chips, however next time I think I'll try regular peanut butter - the chips don't give the texture one expects. To make the cups a little different I also ground up some almonds and pecans to give the filling a nuttier flavour. In a few cups I used marshmallows again, I guess I had making smores on the mind at the time.
Topping the cups was a matter of using coloured sugars, sprinkles, sliced almonds or roasted pecans.
After making the chocolates, I carefully arrange them into 1lb candy boxes. In total each will contain 15 pieces of chocolate :)
Obviously the 29 bottles of wine has nothing to do with cookies, their just another hobby ;) 
I hope you enjoyed these photos, and start thinking about some ideas for making your own chocolates at home :) Do you have any comments, stories about chocolate making? Please post below.

Monday, May 24, 2010

Making Brownies in a Mug, is it Mugalicious?

This recipe goes out to Meet My Mug, a neat blog that celebrates the mugs in our lives. While your checking that blog out you should also take a quick look at Replicca Clothing Company for some awesome handmade fashion. Now on to the brownies!

Ingredients:
4 tbsp flour
2 to 4 tbsp sugar (sweeten to taste)
2 tbsp unsweetened cocoa
A dash of salt
2 tbsp vegetable oil
2 tbsp water
1/3 tsp vanilla
1 tbsp chocolate chips (optional)
and most important of all, a microwave safe mug :)
To make this treat mix all the dry ingredients together in your mug (I chose my now retro Sun Microsystems mug). Be sure to completely mix thoroughly and break up any clumps of cocoa, flour, or sugar.
Next add the oil and water, then mix until well combined. The mixture should be solid enough to support a spoon if the mug is tilted. You may add chocolate chips at this point and mix.
Now to cook the brownie all you have to do is pop your mug into a microwave and heat for 60 to 90 seconds depending on your microwave's power.
Please be careful when you remove your mug from the microwave, it's going to be piping hot! Let cool for a minute then dig in and enjoy :)
I think that I'm going to have to try this recipe at work, I don't think anyone would mind? ;)

Tuesday, May 18, 2010

Rice Krispie Sushi

This treat is very easy to make, all the real effort goes into presentation. To make your own Rice Krispie sushi as shown here you'll need the following.

Ingredients:
Rice Krispies
Butter
Marshmallows - white
Marshmallows - multi-colour
Fruit rollups
Fruit Jelly Candy
Sour Jelly Candy

Extras:
Wax paper
Candy boxes
Chop sticks

Making Rice Krispie treats is strait forward, just melt butter and marshmallows together, then add Rice Krispies. Forming the treats into sushi shapes takes a little dexterity. To produce California Roll shapes first roll some Rice Krispie treats out into a sheet, then place a column of large marshmallow in the center and wrap the warm treat around the marshmallow. Place this roll to the side in order to allow it's shape to set. Once firmed up, wrap the roll with fruit rollup sheet (or fruit by the foot or other similar product). Now you may slice the roll with a sharp knife into discs. Add a fruit jelly candy to garnish :)
The rice rolls are much easier to make, just take a hand full of warm Rice Krispie treats and shape into an oval shape. Use the handle of a spoon to create an indent in the middle of the treat in order to place candies or colored marshmallow filling. Then use fruit wrapping to bound the treats together.
To complete the sushi appearance you may place pieces into a small box and wrap with a bow (including chop sticks), or arrange as a platter.
I hope you enjoy making these treats too!

Home made Space Invader Chocolates!

I received as a gift a neat Space Invaders ice-cube mold, so instead of filling it with water I decided to fill it with Milk & Dark Chocolate... here are a few pics of the result:
Not wanting to serve the chocolates plain, I decided to mount them atop chocolate fudge cupcakes with vanilla icing.
Hope you enjoyed the pics!

Peanut Butter-Chocolate Chip-Oatmeal cookies.

I last made these cookies during a cold Winter's day. Their extra dense with peanut butter, oatmeal and chocolate chips, so a great treat after shoveling snow for a few hours.
Ingredients:
3 cups rolled oats
1/3 cup flour
1 tsp baking soda
1 tsp baking powder
1/2 tsp salt
1 cup brown sugar
1 cup white sugar
1 cup butter
1/2 cup peanut butter
2 large eggs
1 tsp vanilla extract
2 cups whole peanuts
2 cups chocolate chips
Start by mixing the sugars, butter, and peanut butter in a bowl. Once combined start mixing in eggs and vanilla. In a second bowl mix together oats, flour, baking soda, baking powder, and salt. Now you may mix in the oat mixture with the wet ingredients, then add in the peanuts, and chocolate chips. Pre-heat oven to 350F, and begin dropping batter onto your cookie sheets. Bake for 12 to 15 minutes until golden brown.
I was surprised by the quantity of cookies this recipe makes, this batch made 6 dozen.
I hope you enjoyed this recipe!

Sunday, May 16, 2010

Kourambiethes

This Greek cookie is a butter pastry, that compliments any dinner without over powering with flavors.
Ingredients:

2 cups unsalted butter
1/2 tsp ground gloves
1 egg yolk
3/4 icing sugar for the cookie, 1/2 cup more for dusting.
3 oz Rum/Brandy/Whiskey (your choice)
4 cups flour
Mix butter, sugar, cloves, egg, and rum together. Then slowly add flour to the batter.
When all of the ingredients are mixed together the dough will have roughly the smooth texture as above. Place the dough in your fridge for 30 minutes to chill before rolling into balls for baking.
Bake for 12 minutes at 325F. They don't turn golden brown in the oven so you have to poke them to tell if their done. A quick dusting of icing sugar over the top of the cookies and their done.
These cookies are incredibly soft, melting in your mouth. I would suggest having a glass of milk or cup of tea on hand though.